Showing posts with label cheese. Show all posts

04 April 2014

Zucchini Fritters

Usually we have a few sprigs of fresh greens showing up at our farmers market by now, but the worst winter in a hundred plus years is keeping most everything still brown this year. I was so desperate I purchased some little zucchini. I wasn't really sure what I would make but had a day to decide.

I ran across a zucchini fritter recipe that was bland and green as most of them are that I've tried in the past. I came upon a recipe in a newish cookbook called "The Cheesemongers Kitchen" for zucchini fritters that contained goat gouda and WOW are they ever fantastic!!

I changed a few elements from the original recipe to suit my tastes and desires for texture and flavors. My family and cooking class has all agreed we think this is a great recipe! I am enjoying now, but I am imagining how utterly amazing they will be in August.....when it's finally warm.

ZUCCHINI FRITTERS

2 medium zucchini, grated and squeezed dry
3 Tablespoons onion, finely chopped
4 ounces goat gouda, grated
Salt & pepper
1 egg, beaten
1/2 teaspoon sirarcha
1/4cup bread crumbs
1/4 cup flour

Combine all ingredients in a large bowl until well mixed.
Heat a few tablespoonfuls of olive oil in a large skillet over medium high heat. When oil is hot, drop a couple tablespoonfuls of the zucchini mixture into a patty and cook until golden brown. You can do a few at a time, but don't crowd the pan. Turn carefully and brown on other side. Drain briefly on paper towel and serve immediately.

These are wonderful served up imstead of potatoes. Enjoy!


[image_1]
[image_2]


posted from Bloggeroid

12 March 2014

Tartiflette-Fancy name, easy delicious dish

As a "cheesemonger", I have a deep desire to make all famous cheese dishes. The cheese just begs me to create menus that make them even more fabulous! Tartiflette is just that dish. Traditionally made with Reblochon cheese from the Savoie region of France with onion, potatoes and lardons, tartiflette is basically a gratin dish with flair. Since lardons are nearly impossible to find in America and Reblochon cheese can often be bland, unripe, pasteurized versions of their French counterparts, I changed up my recipe to fit available ingredients with the best flavors. Not as traditional but absolutely fabulous and the best taste is really what I'm after!

I've given a few choices for cheese and used each of them to make Tartiflette. When shopping at your cheese shop, choose the ripest one for this dish. You'll want to pinch the cheese slightly and it should feel like pinching the fat place in your hand between thumb and first finger. A tiny bit firm in the middle surrounded by a nice squishy-ness....there, isn't that technical?

I also used fresh bacon that was not smoked. I found it at the local meat market and it is a great substitute for lardons.

TARTIFLETTE a la Boulevard Market

2 lbs. potatoes (I used Yukon Gold)
8 ounces lardons or bacon or unsmoked bacon, cut into 1/2 inch pieces
2 shallots, cleaned and thinly sliced
2 Tablespoons butter
1 clove garlic
3 ounces dry white wine
7 ounces heavy cream
1 pound Reblochon, Tallegio or Pont l'eveque cheese
salt & pepper to taste

Preheat oven to 400 degrees.
In a saucepan, cover potatoes with water and boil for 15 minutes. Drain and remove skins, slice potatoes into 1/4 inch thick slices.
In a saute pan over medium heat, melt butter and cook shallots until soft but not browned. Remove from pan and set aside. In same pan, fry bacon and garlic until just browned. Add onions back in and de-glaze pan with wine for a couple minutes. Season with salt & pepper and add heavy cream. Remove from heat.
Remove rind from cheese and cut into slices about 1/3 inch thick.
In a casserole dish, layer potatoes and bacon mixture and cheese in 2 layers topping with cheese. Bake 10-15 minutes until cheese is bubbling and golden brown.

Amazing and needs very little served with it besides a simple salad dressed with vinaigrette!


09 March 2014

French Onion Soup

French Onion soup always evokes a mental picture of a Parisian bistro with vintage tile floors and a carafe of wine for me. As Spring has been so, so, so slow to arrive we thought a steaming bowl filled with gruyere cheese would be the perfect end to the chilly, snowy day. I personally prefer a few different techniques than you usually see in common recipes. Years ago, Fine Cooking magazine, had me cooking my onions with a layer of tin foil sitting on top of the onions and WOW, it created onion ribbons that just melt in your mouth, so try this if you'd like or just go ahead and caramelize in the pan over low heat. The other thing I really love is when you pour the broth and onions over the toasted baguette slices and then top with cheese and throw under the broiler. The bread itself is tender and filling and I'm not stuck having to add flour to thicken the broth. I prefer the little heartier bites of soup, but it's personal preference!

FRENCH ONION SOUP

4 Tablespoons butter
2 large onions, sliced into ribbons
1 teaspoon sugar
5 cups beef stock
1 bay leaf
1 sprig fresh thyme
10 slices of baguette
1/2 pound Gruyere cheese, grated

In a large pan over medium heat, melt butter and begin cooking onions. Cook on medium about 5 minutes then cut a piece of tin foil to pit the inside of the pan. Place tin foil directly on top of onions and turn heat to low. Continue cooking about 45 minutes.

Slice baguette into 1/3 inch thick slices and bake in a preheated 350 degree oven about 20 minutes, turning once. They should be deep golden brown on both sides.

Remove tin foil and add salt, pepper and sugar to onions. Cook about 5 minutes until golden browned. Add stock, bay leaf and thyme and bring to a boil. Reduce heat to low and simmer 15 minutes. Remove bay leaf and thyme sprig.

In a soup bowl, lay 2 slices of baguette and pour broth and onions over bread. Top wit a generous amount of gruyere cheese and place 6 inches under the broiler. Broil until cheese is melted and turning golden brown. Bon Apetit!


10 April 2013

Marinated Manchego Cheese

I know the title seems odd, yet the concept is not. What to do with the last bits of cheese in the drawer that you're not using? Friends coming over this weekend and you need something to serve up that isn't SO time consuming in the kitchen? Or possibly, you just want to see the sunshine through a beautiful jar filled with spring-ish green, fresh herbs and bits of colorful peppercorns waiting for your family to come through the door and share fabulous food together? My favorite wine to pair this with is a Tempranillo from Spain! Enjoy!

MARINATED MANCHEGO CHEESE

½ cup Extra Virgin Olive Oil, best quality
1 Pound Manchego, Pecorino or hard cheese of choice; rind removed and cut into 1 inch chunks
½ Tablespoons whole Peppercorns
½ Tablespoons Fresh Rosemary, Thyme or Oregano; washed and torn to small clusters

In a small crock or jar with lid, combine all ingredients and let sit for at least an hour at room temperature.

The cheese can be stored in fridge for up to a week, but the olive oil will solidify, so bring it to room temperature before serving. You could also add olives, sundried tomatoes or roasted peppers of your choice to the mix as well.


12 November 2012

Lenawee Magazine Recipes; Truffles & Pumpkin Fondue

I hope you have enjoyed the article in Lenawee Magazine!  It was great fun working with Amie, Lad, Vicki and Sue for such a lovely photo spread.  Many thanks also go out to Sandy Heckerthorn, Linda Prochaska and John (my husband) for being such good sports and expert peelers, choppers and overall helping hands!  I couldn't have done it without you!

If you DIDN'T receive the Lenawee Magazine, feel free to give The Daily Telegram a call at 517.265.5111 and they can point you in the right direction!

The Pumpkin Fondue is simple, elegant and delicious.  It's hearty enough to serve as a side dish to your meal or as an appetizer.  If you are cooking for a smaller crowd, you can adjust the recipe by half as well.  You can see my original recipe post here with additional notes and photos of the assembly.

Pumpkin Fondue

1 5lb-ish PIE pumpkin (do not use jack o lantern type pumpkin)
1 lb. Cheese- 1/2 lb. Gruyere and 1/2 lb. Emmentaler
1 cup heavy cream
1 1/2 cups stock, vegetable, chicken or veal
a generous pinch of freshly ground nutmeg
10 1/4 inch thick baguette slices, toasted until dry and crispy
1 Tablespoon Olive Oil
a pinch of Salt
Remainder of Baguette sliced into 1/2 inch thick slices for eating

Preheat oven to 450 degrees. Cut top off pumpkin and clean out seeds. Sprinkle salt onto inside flesh of pumpkin.

Chop or grate cheeses and set aside. Bake baguette slices until crunchy and golden brown. Mix heavy cream, stock and nutmeg together.

Place pumpkin into shallow roasting dish and layer baguette slices, then cheese, then cream mixture into 2 layers inside pumpkin. You may have baguette slices left over.


Put pumpkin top back on. Rub exterior of pumpkin with olive oil. Bake 1 hour and 15 minutes until cheese is bubbly and pumpkin is golden brown. Using 2 spatulas, remove from baking dish carefully and place on platter. Serve with additional baguette slices or as a side dish. You'll want to scoop up the roasted pumpkin flesh with all the cheese as you are serving or eating!


TRUFFLES 
 12 ounces Bittersweet Chocolate chopped into small pieces
2/3 cup heavy cream
1 teaspoon pure vanilla extract or 1/2 vanilla bean seeds

In a large saucepan over medium heat, bring cream to just boiling.  Remove from heat, add chocolate and vanilla and stir until completely melted.

Allow to cool in refrigerator about an hour.  Using a teaspoon, melon baller or small scoop, create truffle balls, rolling gently in hands.  You'll want to work it quickly in your hands to avoid melting.

Finish by rolling in cocoa powder, raw sugar, colored sugar crystals, even coconut or crushed candy canes!  Use your imagination!    

For the magazine, I zested an orange and mixed the zest with about the same amount of raw sugar.  I let the mixture dry on parchment paper overnight then crushed it between my fingers and rolled just the top of the truffle in the orange/sugar.  

Place the truffles on a parchment lined baking and refrigerate an additional hour.  Then place in an airtight container, between layers or waxed/parchment paper in a cool place and they should last about 2 weeks.

NOTE: Bittersweet chocolate is between 65%-75% cacao.  The lower the number, the sweeter the chocolate.  Milk Chocolate will not firm up in this recipe, so I recommend using the bittersweet.  If you'd like the truffles sweeter, make sure to use the 65% bar and roll in a sugar.

I hope you enjoy these recipes as much as we have!  Happy Holidays!


04 August 2012

OMG, More Zucchini....A lovely salad

Yes, we still have zucchini.  You would think after several days of 100+ degree temperatures that the buggers would at least slow down production.  Not so.

After eating this salad, I don't want the zucchini to ever stop and may seriously buying it (*gasp*) out of season at the grocery!!

I've mentioned the cookbook "Plenty" before and one taste of this salad will be explanation enough as to why I love it so much!  Of course I had to substitute a few items in the original recipe due to living in a rural community, but I'm going to assume they made it taste BETTER!!

The other perk of this salad is the grilled zucchini that gives it a substantial feel and grilled flavor.  Perfect for the vegetarians in your life, or as a filling luncheon salad. 

I didn't completely peel the hazelnuts after oven toasting to give a little color to the salad and keep a rustic look going on!  I also used my vegetable peeler on the Parmigiano-Reggiano to have a nice cheese curl and a larger piece of cheese.


ZUCCHINI & HAZELNUT SALAD

1/3 cup hazelnuts
3 small zucchini, sliced on bias about ¼ inch thick
4 Tablespoons Olive Oil
Salt & pepper
1 Teaspoon balsamic vinegar
1 ¼ cup lettuce, sliced, I used romaine hearts
¼ cup basil leaves, torn
3 ounces Parmigiano-Reggiano cheese, shaved with vegetable peeler

Preheat oven to 300 degrees.  Spread hazelnuts on a baking sheet and roast 12-15 minutes until nicely browned.  Rub off skin, or leave on and roughly chop.

In a small bowl, toss zucchini with 2 Tbs. olive oil, salt and pepper.  On grill over high heat, lay out zucchini slices and cook 2 minutes per side, making sure you get nice grill marks.  Place in a mixing bowl and toss with balsamic vinegar.

Allow zucchini to cool, then add remaining olive oil, hazelnuts and basil.  Mix lightly, taste and adjust seasonings. (I added a bit of additional balsamic at this point too!)  Place small pile of lettuce on plate, top with zucchini mixture and a few pieces of shaved Parmigiano cheese.


21 January 2012

Cheesy Quinoa Cakes

I don't love quinoa.  There, I've said it and it's public.  I guess there isn't much to like or dislike about in my opinion.  It's just so blah and a bit funky in texture and not my thing.  I've tried the red and black varieties as well...same thoughts. 


I originally happened upon a recipe on Pinterest for Cheesy Quinoa Cakes.  After making a few batches, we decided we have fallen in love with fried quinoa!  Does this reduce the health benefits?  I used olive oil for frying, so my personal thought is "NO WAY!"  I did do some major adjusting to the recipe to fit my family's preferences and also make the cakes easier to fry and the aioli a bit tastier!  I hope this makes YOU fall in love with quinoa or suffer it gladly!  


CHEESY QUINOA CAKES

1 1/2 cups cooked quinoa
1 large egg
1/4 cup all purpose flour
1/2 cup grated Cotswold cheese or Raclette cheese
3 Tablespoons sliced scallions, white and green parts
1/2 teaspoon each salt & freshly ground pepper


(NOTE; if using the Cotswold cheese, you may want too omit the scallions, since the cheese is flavored with chives and onions)

Gently mix quinoa and flour until combined, add egg and stir until totally combined.  Stir in cheese, seasonings and scallions if using.

In a saute pan over medium high heat, pour in about 4 tablespoons olive oil.  When hot, use a small ice cream scoop and drop scoops of quinoa mixture carefully into hot oil.  Flatten gently with a spatula until desired thinness.  Brown on each side and serve immediately!


AIOLI
1/2 cup homemade mayonnaise
1 clove garlic, mashed
1 teaspoon fresh lemon zest
salt & pepper to taste
1/2 teaspoon Sriacha Sauce (feel free to add more if you like it spicy!)


Stir until combined and allow to sit about 15 minutes for flavors to meld well!


12 January 2012

Tomato Basil Appetizer Pizza

It was years ago when I last attended a "home" party for kitchenware.  I still have lots of their stoneware baking pans that I love!  At one such party, the hostess made an appetizer pizza that was fantastic!  I am not the sort to buy doughs in a tube (John DOES love Grands biscuits however...) so I adjusted the recipe to fit my kitchen and it's a winner!  I've included my favorite pizza crust recipe, but you could substitute any that you prefer (including one from a tube, I won't tell!).


While I namely make my own mayonnaise, for this recipe you will want a purchased variety, the homemade just doesn't have all the weird stabilizing ingredients the jar stuff has.  This recipe fits about a 13X15 baking pan, or maybe a bit larger.

HOMEMADE PIZZA CRUST:

1 cup hot water
1 Tablespoon instant yeast (if using dry active, proof yeast in water first)
2 teaspoons olive oil
1 teaspoon salt
2 1/2- 3 1/2 cups all purpose unbleached flour (I've successfully used 1/2 whole wheat 1/2 white flours, anymore than that and the crust was a bit too tough for our liking)

Throw everything into mixing bowl and use dough hook on low speed for about 4 minutes, add additional flour until a smooth, glossy dough is achieved.  Let rise about 15 minutes until nearly double.  Punch down dough and roll directly onto lightly greased baking sheet.

PIZZA INGREDIENTS:
2 cups shredded mozzarella cheese, divided
1/2 cup parmigiano-reggiano cheese, grated
2/3 cups mayonnaise
1-2 cloves minced garlic
6 small or 4 medium tomatoes, thinly sliced
3-4 Tablespoons fresh basil, thinly slice the leaves

Preheat oven to 375 degrees.

Sprinkle the prepared, uncooked pizza crust with 1 cup shredded mozzarella cheese.

Place tomato slices evenly over entire pizza on top of the mozzarella cheese. 

In a small bowl, combine mayonnaise, garlic and basil and mix well.  Add remaining cup of mozzarella cheese and parm cheese.  Blend until combined (will be clumpy and thick).  Drop evenly on top of tomatoes and carefully spread to cover.  This will be a bit difficult, but looks won't matter once it's cooked.

Bake 15-20 minutes until top is lightly browned and cheese is bubbly!  Cut into small diamonds and enjoy! 


12 November 2011

Incredible Cheeses & First Snowflakes


The first snowflakes of the season for us fell yesterday.  It was beautiful and horrific at the same time.  Giant flakes drifting in the steely grey overcast sky, hanging holiday lights surrounded by cheeses, Italian turrone and fresh bread at The Boulevard Market...all beautiful.  Knowing this will be our weather for the next 5 months...not so beautiful.

I decided instead to think about how many lovely cheeses have arrived from all over the world this week and make myself a Salted Caramel Mocha (recipe to come tomorrow)!


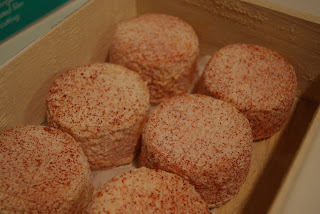
 Beautiful French Goat milk Crottins dusted with Piment d'espelette, a Basque chili pepper that is mild and very flavorful.  I can envision a generous wedge adorning my next omelet! 


The stunning beauty of Shropshire Blue is always a welcome sight for me around the holidays, as it really makes a cheese plate "pop"!  The flavor profile is similar to Stilton, yet a bit stronger with a slightly sour note like Cheshire.  I love it with a thin drizzle of honey!

The plastic glare is not attractive on this Soreda goat cheese assortment...I guess I'll just HAVE to open a package and then I will HAVE to eat them! :) Soreda is a producer of goat cheeses from the Perigord region of France and these tiny trays of goat cheeses are my favorite of their lineup.  Small orbs of fresh goat cheese rolled in various herbs, spices and dried fruit and adorned with a tiny "stem"!  Absolutely charming and delicious!


And finally, the Italians...how can even their cheese wrapper be anything but elegant and stylish?  The wrapper is just the beginning here however.  A combination of  sheep and cows milk in a little soft, furry, pasty package.  Delicate flavor, super rich and creamy, it's a cheese made to celebrate everything in your life!  I paired mine with an Ortrugo made by Santa Giustina in Italy.  Ortrugo is a lovely not-too-dry white wine, and Santa Giustina's Gaia Bucharelli is creating hers in a "vivace" style, meaning just a bit of fizziness to the wine.  Here is Gaia's description of her Ortrugo:

"Color: Light straw Bouquet: Fine, intense, frank, floral, golden apple Taste: Vivace, good structure, equilibrium and long persistence Food paring: Aperitif, cold appetizers, fish"

In Erika's words..."YUM"!     


04 September 2011

New Friends

Over a year ago, I was looking for a puppy and deciding which breed was right for me.  I ran across a blog written by Juli, from Los Angeles California.  Juli has 3 Pugs and I have since enjoyed communicating through our blogs (www.teapotsandpolkadots.blogspot.com ) about our dogs and life.  Juli has given me great advice for raising Pierre and  I have enjoyed seeing her slice of California life!

After posting pictures of Gina's graduation from the University of Michigan, Juli contacted me and revealed that her son would be a Freshman at Michigan this year and they would be coming to move him into the dorms!

We discussed the logistics and Juli's family decided to stay at our Inn On Evans above The Boulevard Market and we met them there on Sunday evening with Pierre.

I have to admit, this was a bit strange for me as I've never had an internet friend before and I wasn't sure what to expect.  Blogs are an interesting peek into someones life.

Juli was just as warm and friendly, chatty and personable as I expected!  We slipped into friendship as if we had known each other forever!  We were able to carve a bit of time out of preparing their son, David's, dorm room to go to Downtown Home and Garden (I thought Juli would love this place) and have supper together.

Juli and her husband Jeff, were so thoughtful to bring us a taste of their California, local cheese and goodies, and a gift for our Pierre....

The cheese was from "Andante" of Petaluma California and with a stellar reputation of which I had only read about, I was so excited to be able to have a piece of my own!  Simply Fabulous.  Their local "ThinKrisps" Savory Sage Parmesan...unbelievable.  Bacon Chocolate Chip Cookie...sinfully fantastic! 

I was absolutely enchanted by her selection of "sweaters" for Pierre, including a Los Angeles hoodie!  They are ridiculously cute and SO Juli! (I can't wait to return the favor..don'tcha think the Pugs would look amazing in maize and blue ;))    Each sweater is cuter than the last.  I need an extra set of hands to corral little Pierre into each and take photos.  I will be posting them soon!
      
 We had a lovely visit and it was time to say "good-bye", yet Juli is writing blog posts already and it's as if she is around the corner!     


21 June 2011

Farmers Market Etiquette

Enfant Rouge Farmers Market Paris France


Tables of fresh lettuce all in a beautiful, towering stack, bundles of radishes still damp from their morning under the faucet, wooden quart boxes overflowing with ripe, red, fragrant strawberries, globes of fresh mozzarella cheese and jars or jewel colored jams are just a hint of what we find at the Farmers Market each week.  It's also a large part of Four Corners Creamery and Prochaska Farms weekly work load. 
Les Halles Farmers Market, Paris France

There is something special about the Farmers Market, a way to connect a person to the food we eat, a sense of community, the anticipation and surprise of what we might find to take home this week and for me personally, a bit of mystery as to what we will be eating fresh this week!
Saline Tuesday Evening Farmers Market Saline Michigan

I thought I'd share a few insider tips on how to make the Farmers Market vendors your very best friends and get the best selections for the week!

  • TRUST; trust that your vendor is bring the very freshest, ripest,  finest product he has to offer!  Look for the busiest vendors, they usually have a good reputation that you can build on.  Ask them to pick the "best" of the selection for your and they gladly will! 
  • KNOWLEDGE; know approximately what should be in season and what to expect this week.  All climates are different and unlike the grocery store, farmers will have only what they have grown and is ripe that week.  
  • QUESTIONS; Be clear when asking questions about pesticide use, production, handling etc, and be conscience of the farmer's time as Farmers Market hours are usually limited.  Often you can ask to visit the farm or facility if you'd like more information. 
  • BAGS; I always bring at least 2 bags; one for dry stuff and one for wet stuff.  I never take the wooden or plastic boxes on display, they are too bulky and cost the farmer.
  • TOUCHING; I just don't do it!  This is not the grocery store that has product and produce sitting on the shelves for weeks.  Fruits and vegetables are picked ripe and sold in a short time from the farmer.  Customers handling them for 6 hours will ruin tomatoes, berries, lettuce etc.  Cheeses and breads are also fragile, not to mention, do I want to purchase food that 100 people have had their hands on that morning?  I expect the best and if I don't get it, I won't buy from that particular farmer again.
  • NEGOTIATING;  I have read many articles in magazines encouraging negotiating/asking for a price break with farmers and am always flabbergasted at this notion.  I feel as the value for the asking price is always very fair, if not downright cheap.  The cost involved in getting a farmer to market is quite extensive; labor to pick and wash, cost of space at the market, gas in driving large trucks full of product, time and extras like bags, signs, etc. Also, depending on the availability of produce, the farmer is competing with everything from backyard gardeners to huge stores like sams club.  There is no level playing field in farming.  If I come across the last head of napa cabbage, I am giddy that I got there before it was gone for the week!  I don't ask for a discount.  I'm not sure where people got the idea that it's acceptable to bargain with a farmer over a 50 cent pepper or $3 watermelon....Would your employer ask you for a discount on or negotiate your paycheck?  It's the same concept.  Walking 10 feet in a farmer's shoes has me gladly paying $3 for a quart of fresh strawberries.
  • ENJOY YOURSELF; The Farmers Market is the one place you can really have fun with food, enjoy the weather & your community.  You can bring your dog (check out this gal dressed up) and your  children, ride your bike and have a coffee and a multitude of tasty treats!  You can feel great about shopping locally and bring home a beautiful bouquet!      
We really love bringing Four Corners Creamery cheeses to many farmers markets in the area and have met so many lovely people, we feel very grateful that they purchase from us each week and enjoy what we make for them!  I think it's particularly special that they have chosen our cheese for their supper table.  It's being there in spirit!
Main Street Farmers Market loot! Blissfield Michigan


01 June 2011

Grilled Pizzas

Over the last 5 years we have had a house full of teenagers every weekend and during the summer-ugh!  They have literally eaten us out of the house!  John and I just leave the house since we get so tired of them crowding up the kitchen!  We don't mind (most of the time)as long as they clean up after themselves!

Everyone's favorite lunch and supper is grilled pizzas.  I love them because they are made outside and it limits the mess in the kitchen.  The kids love them because we have a ton of different toppings to fit each persons tastes and they are SO quick! 

I also love this recipe for the fact it makes a good size batch and I can throw the remaining dough in the freezer for another day.  Just take out in the morning and leave on the counter.  Risen and ready to be rolled out by 6pm! 


Grilled Pizzas
1 1/4 cups hot water
1 pkg quick rise yeast (I use 1 tablespoon instant yeast-no proofing!)
1/4 cup olive oil
1 teaspoon kosher salt
4 cups all purpose flour

If using any yeast but instant, mix hot water & yeast in mixing bowl and let sit about 5 minutes until foamy.
Add olive oil, salt and 2 cups of flour.  Attach dough hook and mix on low until completely combined.  Add remaining flour and let mix until ball forms.  Allow another 2 minutes of kneading.  Let rise until about doubled.(15 minutes for instant yeast, 45 for active dry)

Heat grill to between medium and high (so technical eh?) and start rolling out dough.  I smear a BIT of olive oil on the counter and roll a small ball of dough into an 8 inch circle.  Brush one side with olive oil and sprinkle with a pinch of salt.  Place dough oil side down on grill.  Allow about to cook 3-4 minutes until golden brown, flip dough and add toppings immediately. Close grill lid and cook about 4 additional minutes or until cheeses are melted.  Watch carefully so you don't burn your crusts!  Adjust heat as necessary or pizza away from any hot spots.  Enjoy!

Toppings are endless!  Go with what you love!


09 April 2011

Yucky wine...


I'm not a wine snob.  We sample and drink a fair amount of wine through The Market and they are usually really decent wines.  I also like to buy wines I'm not familiar with, for their labels and bottle colors/shapes and or unusual varieties.  It's a way to get out of my comfort zone with wine drinking.

Occasionally we come wines that are nasty.  If I don't want to drink them, I don't want to cook with them either.  I dumped them down the drain for the longest time until I decided to make wine jelly after tasting some lovely Italian wine jelly made from Lambrusco wine.

The first couple batches I made from really lovely wines and they turned out fantastic.  Then I made a batch of wine jelly with a hideous Rose from Spain...and it was delicious!!! Since then, I have strictly used wines I don't care to drink and time after time the jelly turns out great!  Red, White or Rose, it doesn't make a difference and I have been known to throw in whatever wine is hanging around, regardless of color.

I usually buy some fun stemless wineglasses to fill for gift giving with a hunk of cheese, but any glass jar will work if you don't want a truly preserved jelly (no sealing of jars) and recipients should store refrigerated.  The jelly is an incredible accompaniment to salty, soft cheeses but also works great in thumbprint cookies and on toast/bagels/quick breads for a lovely brunch item.      


WINE JELLY


2 cups Wine (any will do!)
3 ¼ cups sugar
1 pouch liquid pectin

Bring wine and sugar to a boil.  Add the pouch of liquid pectin and boil for exactly 1 minute!  Pour into clean, hot jars and process in a water bath for 10 minutes.  (You can find directions on water bath processing in the pectin instructions.)

I think you'll love this recipe!  Let me know how your icky wines turn into beautiful jellies!


07 February 2011

Kumquats

Every January/February I cannot resist purchasing tiny orange kumquats.  Tiny, shiny and citrus-y, they just jump into my basket!  I am always intrigued by their sweet/sourness.  I make the same recipe with them every year.  Kinda silly, I know, but it's so good!  A little "chutney for cheese" is the recipe and it's so easy! 


KUMQUAT CHUTNEY
1 cup water
1/4 cup sugar
1/4 lb. kumquats (1/2 pint containers are perfect) sliced 1/4 inch, seeds removed
2 teaspoons whole peppercorns (the mix of green, red, black and white look pretty)
1 star anise (whole pod)

In a saucepan over medium high heat, bring sugar and water to a boil and reduce by about half.  Turn heat to low and add remaining ingredients.  Cook, stirring occasionally about 6-8 minutes until kumquat rinds are soft.  Remove star anise and let cool.  Store in a small jar or crock in refrigerator.

My FAVORITE cheese to eat Kumquat Chutney with is Delice de Bourgogne.  Delice is a triple creme cows milk cheese from France.  It looks similar to brie, yet it's softer, richer and taller.  You want to purchase a piece that is not still chalky in the middle.  Soft cheese stop aging once they are cut, so taste before purchasing to assure you get the appropriate age.

I remove the rind on Delice as it is a really pungent and in my opinion, unappetizing flavor.  However, it is edible, like most brie/camembert rinds and strictly a matter or individual tastes.  You can also purchase Delice in a small round inside a wooden box, in that case, I merely scrape off the top rind and use a knife to scoop out the cheese.

Allowing your cheese to come to room temperature is vital!  It always tastes so much better, the texture improves and doesn't harm the cheese in the least!  Delice should last in your fridge for about 3 weeks if you're purchasing from a reputable "cheesemonger" and it's a wedge.  The small rounds with the rind intact will last a bit longer and continue to age.  Served with a sparkling wine like Prosecco, Cava or Champagne will give you the most immense pleasure to be had while eating cheese!  It's worth the splurge!  

 The kumquat chutney keeps quite well in the fridge and could be used along side chicken, other poultry or pork if you desire.  I think duck would be super with it!


30 September 2010

Pumpkin Fondue


One of my all time favorite vegetables is pumpkin. Sweet or spicy, baked, sauteed or pureed, I anticipate many pie pumpkins each autumn. I'm always looking for something a little different to do and this Pumpkin Fondue happens to be a fantastic recipe to make for yourself or share. {The fact that it is filled with CHEESE is a bonus in my book!} I originally made the recipe out of Gourmet magazine, but have tweaked things a bit to be more to our liking.

I adore a one-dish wonder and this is it! It can be served as an appetizer or a side to your feast. The idea that the cooking vessel is the pumpkin itself is quite trendy if you see this month's cover of Food Network magazine (or maybe it was Rachel Ray?) and shouldn't intimidate you! I use an old fashioned enamel roasting pan with perfect results and shallow enough to get the sucker out and onto a serving platter! (I made the mistake of putting it into a higher edged casserole dish the first time and it was a challenge to lift it out of the baking dish.)

The recipe calls for Swiss cheeses, but if you're a cheddar person, feel free to substitute! I have also successfully added blue cheese to my Swiss blend and it was fab! Cheese dishes taste a little bit better when you use a blend of cheeses; Gruyere and Emmentaler, Cheddar and Asiago, Butterkase and Manchego...it gives the finished dish more dimension. Some cheeses tend to be on the drier side and need a complimentary cheese to give it some goo (technical cheese term!). Shredded cheese from the grocery works well on pizza, but is not up to snuff flavor-wise for this recipe. If you want to use a squash, feel free! I made this in a butterCUP squash, a squatty, ridiculously tough skinned, dark green squash and it was delicious! Enjoy!

Pumpkin Fondue

1 5lb-ish PIE pumpkin (do not use jack o lantern type pumpkin)
1 lb. Cheese- 1/2 lb. Gruyere and 1/2 lb. Emmentaler or read above
1 cup heavy cream
1 1/2 cups stock, vegetable, chicken or veal
a generous pinch of freshly ground nutmeg
10 1/4 inch thick baguette slices, toasted until dry and crispy
1 Tablespoon Olive Oil
a pinch of Salt
Remainder of Baguette sliced into 1/2 inch thick slices for eating

Preheat oven to 450 degrees. Cut top off pumpkin and clean out seeds. Sprinkle salt onto inside flesh of pumpkin.

Chop or grate cheeses and set aside. Bake baguette slices until crunchy and golden brown. Mix heavy cream, stock and nutmeg together.

Place pumpkin into shallow roasting dish and layer baguette slices, then cheese, then cream mixture into 2 layers inside pumpkin. You may have baguette left over.


Put pumpkin top back on. Rub exterior of pumpkin with olive oil. Bake 1 hour and 15 minutes until cheese is bubbly and pumpkin is golden brown. Using 2 spatulas, remove from baking dish carefully and place on platter. Serve with additional baguette slices or as a side dish. You'll want to scoop up the roasted pumpkin flesh with all the cheese as you are serving or eating!